TL;DR
Moving your rig into a closet drastically reduces noise — but only if you handle proper placement, acoustic dampening, and ventilation. These simple strategies turn a small, echo-prone space into a focused, quiet studio with minimal effort.
Imagine turning a tiny closet into your secret recording lair. It sounds wild, but it works. The biggest noise problem isn’t your mic or speakers — it’s your rig sitting loud and proud right next to you. The real trick? Moving that noisy beast somewhere else.
In this guide, you’ll learn how the right placement, dampening, and ventilation turn a closet into a quiet, focused space. Whether you’re recording vocals, streaming, or running a high-power AI rig, these practical tips will help you get top results without overbuilding.
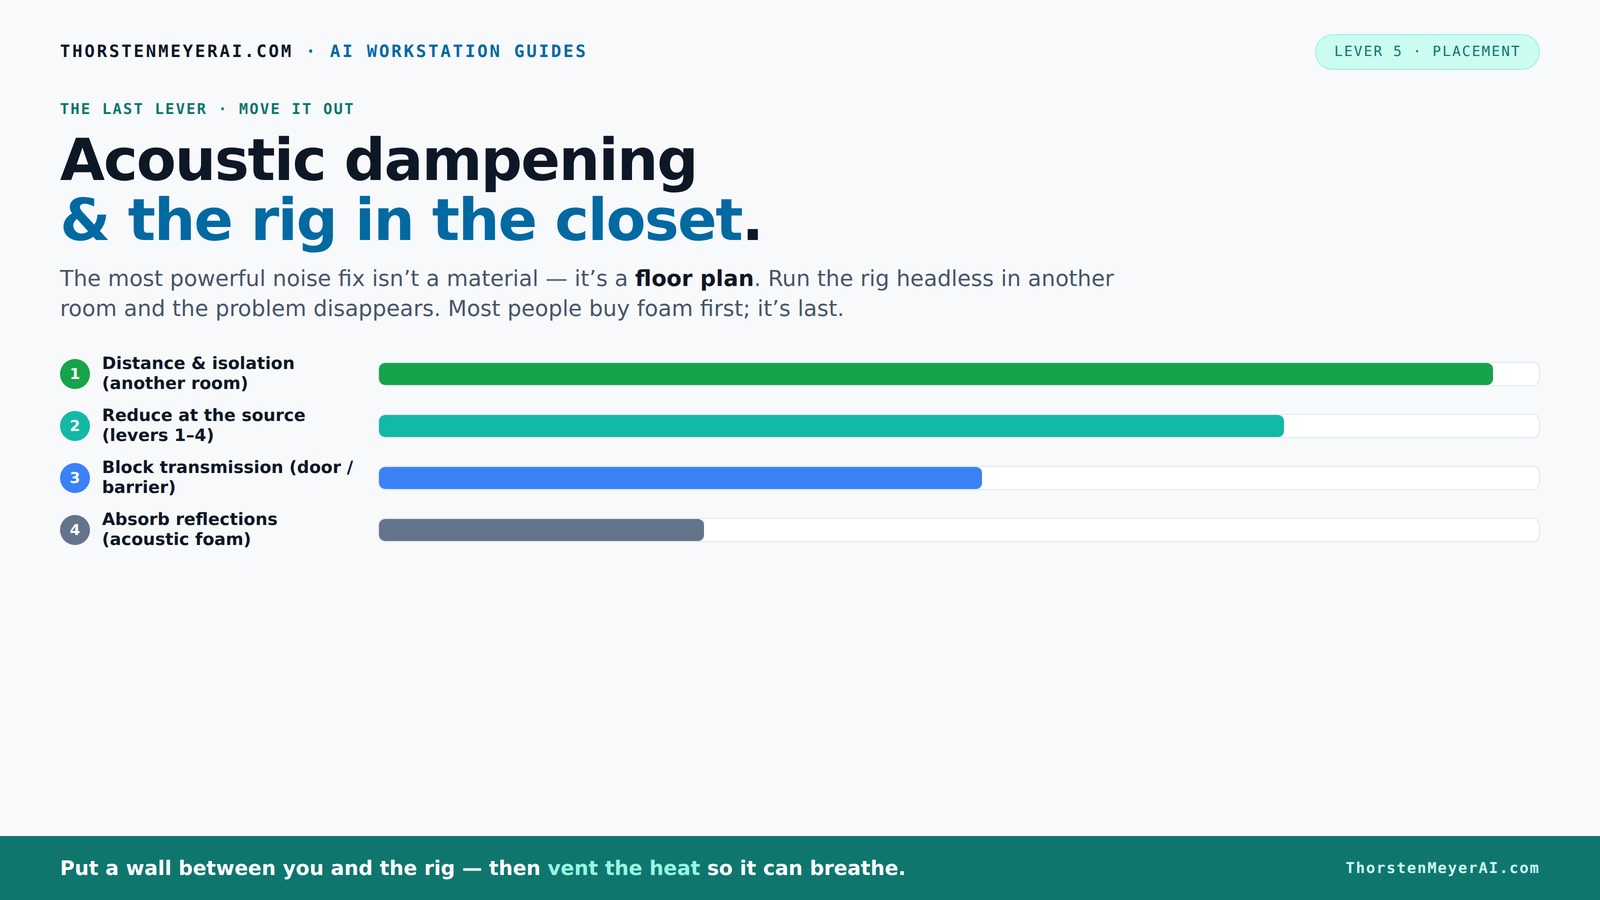
Acoustic dampening
& the rig in the closet.
The most powerful noise fix isn’t a material — it’s a floor plan. A rig you can’t hear because it’s in another room beats any amount of foam. Tap the approaches in Part 1 to see what actually works.
(another room)
(levers 1–4)
(door / barrier)
(acoustic foam)
Contain the noise, not the heat
Key Takeaways
- Distance your rig from your workspace to cut noise dramatically.
- Treat reflection points — not just corners — for clearer, warmer sound.
- Ensure proper ventilation in closet setups to prevent overheating and noise.
- Use thick blankets, foam, and bass traps to target specific frequencies and reduce echo.
- Seal gaps around doors and vents to improve isolation without permanent modifications.

Focusound 52 Pack Acoustic Foam Panels 1" x 12" x 12" Sound Proof Foam Panles Soundproofing Noise Cancelling Wedge Panels for Home Office Recoding Studio with 300PCS Double-Side Adhesive
Soundproofing - Acoustic foam panels triangular grooves structure for better noise absorption, helps to reduce and absorb unwanted...
As an affiliate, we earn on qualifying purchases.
As an affiliate, we earn on qualifying purchases.
Why Distance and Isolation Are Your Best Noise Fixes
Distance is the number one way to cut noise. If you can put your rig in another room — a basement, a closet, even a nearby storage space — you’ll notice a drastic difference. It’s the simplest, cheapest, most effective fix.
Think of it like a loud neighbor. If you move the speaker away from your ear, the sound diminishes. For AI rigs or gaming PCs, this is the gold standard. You SSH into your machine, and the noise stays far away, out of sight and earshot.
Two things matter here: a wired connection (or a strong Wi-Fi link) and good ventilation. Without airflow, you risk overheating — which leads to noisy fans and throttling. That’s why a dedicated, well-ventilated closet or room is your best bet.

Ekkogo Studio Monitor Isolation Pads Premium Acoustic Foam Elevates Audio Ideal for 5 Inch Speakers Enhanced with Vibredux HD Foam for Superior Isolation
【ADVANCED VIBREDUX HD FOAM】: Experience the acoustic excellence of Vibredux HD foam with Ekkogo's Studio Monitor Isolation Pads....
As an affiliate, we earn on qualifying purchases.
As an affiliate, we earn on qualifying purchases.
The 'Rig in the Closet' Setup — How to Keep It Cool and Quiet
Placing a high-performance, heat-generating rig in a closet is brilliant for noise reduction — if you get the airflow right. Sealing it completely traps heat, which is a recipe for overheating. No matter how quiet your fans are, heat will cause them to roar.
To make a closet work, you need active ventilation:
- Passive vents — small openings or louvered panels to let air flow.
- Exhaust fans — a quiet, thermostatically controlled fan pulls hot air out.
- Proper ducting — directing hot air outside or into a well-ventilated area.
Serious soundproofed cabinets blend acoustic foam with temperature-controlled fans, balancing silence with cooling. If you just throw a fan in, make sure it’s quiet and not adding more noise. Check out this guide for detailed setup tips.

Audimute Soundproofing Acoustic Door Seal Kit - Door Sweep and Seal - (Large Size)
Includes (2) Door Seals (3/16" x 1/2" x 50') and (1) Door Sweep (1/2" x 1.5" x 25').
As an affiliate, we earn on qualifying purchases.
As an affiliate, we earn on qualifying purchases.
Placement Matters: Treat Reflection Points, Not Just Corners
Acoustic dampening isn’t about stuffing foam into every corner — it’s about treating where sound bounces. In a tiny closet, the biggest reflections usually come from the back wall behind your mic, the ceiling, and the side walls.
Imagine speaking inside a shoebox — reflections bounce off parallel walls, creating low-end buildup and flutter echo. To tame this, focus on:
- Placing absorption panels at the reflection points on walls and ceiling.
- Using thick blankets or foam on the door and floor to cut reflections.
- Installing bass traps if you notice boomy, muddy low frequencies.
Identifying these reflection points is crucial because sound naturally bounces off surfaces where there's a direct line of sight from the source to the reflective surface. Ignoring these points means leaving significant echo and reverb untreated, which can muddy your recordings and make speech sound distant or hollow. Proper treatment at these key spots ensures clearer, more professional audio. The tradeoff is that over-treating can deaden the space too much, so balancing absorption with a natural sound is important. Remember, the goal is to tame the most problematic reflections without creating a dead, unnatural environment. You can learn more about acoustic treatment techniques at this resource.
Ekkogo Studio Monitor Isolation Pads Premium Acoustic Foam Elevates Audio Ideal for 5 Inch Speakers Enhanced with Vibredux HD Foam for Superior Isolation
【ADVANCED VIBREDUX HD FOAM】: Experience the acoustic excellence of Vibredux HD foam with Ekkogo's Studio Monitor Isolation Pads....
As an affiliate, we earn on qualifying purchases.
As an affiliate, we earn on qualifying purchases.
How Thick and Where to Place Acoustic Foam for Best Results
Acoustic foam thickness matters — but not as much as placement. In a small closet, 2-inch foam panels are usually enough to absorb mid and high frequencies. Larger, 4-inch panels excel at tackling lower frequencies and bass buildup.
Place foam directly where the sound hits — behind the mic, at reflection points on walls, and above your desk. Covering about 20-30% of the wall surface with foam is a good starting point. Too much can deaden the room excessively, making it sound unnatural.
Strategic placement is key because foam works best when it intercepts sound waves at their most reflective points. For example, placing foam behind the mic reduces proximity effect and early reflections that cause muddiness. Similarly, covering reflection points on walls and ceiling prevents flutter echo and ringing. The tradeoff here is that too much foam can make the room sound overly dead, which might affect vocal tone or instrument clarity. The goal is to absorb enough to reduce problematic reverberation without sacrificing liveliness. For more tips, visit this guide.
Do Moving Blankets and DIY Treatments Really Help?
Yes, moving blankets and DIY solutions can cut reflections and flutter echo—especially in budget setups. They’re not soundproofing miracles, but they dampen room tone effectively.
Imagine wrapping your closet in a thick quilt. It softens the sound bouncing around. Hanging blankets from the ceiling or sealing gaps around the door reduces echo and makes your recordings sound tighter.
While they won’t block loud external noise, they do a great job of making your voice sound more professional and reducing internal echo. The key is in how you hang and position them: the more surface area they cover, the better they absorb sound. Keep in mind that DIY treatments are most effective at reducing mid and high-frequency reflections; they won’t significantly block low-frequency bass rumble. The tradeoff is simplicity and affordability versus complete sound isolation. For many home setups, they strike the perfect balance, providing noticeable improvements without complex installations.
Bass Traps in Small Closets — When and Why You Need Them
Bass traps help tame low-frequency buildup caused by parallel walls in small rooms. If your recordings sound boomy or muddy, bass trapping is the solution.
In tiny closets, low-end issues often come from standing waves. Installing foam bass traps at the corners or behind your mic can smooth out these problematic frequencies. You don’t need massive traps — 4-inch panels in the corners suffice for most small spaces.
Adding bass traps reduces low-frequency resonance that can cause a recording to sound hollow or muddy. Learn more about effective bass trapping at this site.verly boomy. Without them, low-end sounds can be uneven and muddy, making your voice or instruments lack clarity. The tradeoff is that bass traps occupy space and can be visually intrusive if not integrated carefully. For small rooms, a few well-placed bass traps often provide the biggest improvement in sound balance, especially when combined with proper reflection treatment.
Sealing Gaps and Doors: The Hidden Weak Points
Acoustic dampening works best when you seal gaps around doors and windows. Cracks and openings are the weak points letting sound leak in or out.
Use weatherstripping, draft stoppers, or door sweeps to block these leaks. A well-sealed door can significantly improve isolation, especially if you’re trying to keep external noise out.
The tradeoff here is that sealing gaps can sometimes make the space feel more enclosed or claustrophobic if overdone, so balance is key. Proper sealing prevents external noise from infiltrating your space and minimizes sound leakage, which is especially important if you record at different times or share walls with noisy neighbors. The effort involved is minimal but yields substantial improvements in perceived soundproofing, making your small space more controlled and less prone to external disturbances.
Microphone Choice and Placement — Making It Work in a Tiny Space
The right mic can turn a noisy closet into a professional-sounding studio. Dynamic microphones are less sensitive to room reflections, making them ideal for small, untreated spaces. Condensers pick up more ambient sound unless carefully placed.
Position your mic close to the source — about 6-12 inches — and use a pop filter. This minimizes room reflections and low-end mud. Closer placement reduces the mic’s pickup of room reverberation, which is vital in untreated spaces. However, very close miking can introduce proximity effect, boosting bass frequencies, so positioning and mic choice should be balanced based on your sound goals. For example, a YouTuber switched from a condenser to a dynamic mic, noticing cleaner vocals with less echo. The tradeoff is that dynamic mics may have less sensitivity and a different tonal character, so choose based on your recording needs and room acoustics.
Making a Closet Studio Without Permanent Changes
Renters and creators love reversible solutions. Using blankets, portable panels, and furniture to absorb sound doesn’t require drilling or painting. You can set up and take down in minutes.
Think of it like dressing the closet with sound-absorbing layers — a rug, blankets, and temporary panels. It’s flexible, affordable, and effective.
For example, a streamer used portable foam panels and hanging blankets, creating a quiet zone that they could dismantle whenever needed. It’s all about smart layering. The tradeoff is that temporary solutions may not be as effective as permanent fixtures, but they offer great flexibility and can be adjusted or removed easily, making them perfect for renters or those who frequently move or reconfigure their setups.
Frequently Asked Questions
Is acoustic dampening the same as soundproofing?
No. Acoustic dampening reduces echo and reflections inside a room, making recordings sound clearer. Soundproofing blocks sound from entering or leaving the space altogether. In small closets, dampening is usually enough to improve sound quality, but for full isolation, extra sealing is needed.
Where should I place acoustic panels in a closet booth?
Place panels at the reflection points — behind the mic, the ceiling above your desk, and the side walls where sound bounces. Use a mirror trick: position a mirror along the wall and see where the reflection from your mic hits. That’s where your panels should go for maximum impact.
Do I need bass traps in a tiny closet?
If your recordings sound boomy or muddy at low frequencies, yes. Bass traps at the corners help tame standing waves and low-end buildup in small spaces. They’re especially useful if you notice your voice sounds hollow or overly resonant.
How thick should acoustic panels or foam be?
For most small closets, 2-inch foam panels are enough for mid and high frequencies. If you struggle with low-end issues, invest in 4-inch panels or bass traps. Thicker panels absorb more low frequencies and improve overall clarity.
Will moving blankets help reduce echo?
Yes. Hanging blankets absorbs reflections and flutter echo, especially in budget setups. They won’t block external noise but will make your recordings sound much warmer and professional. They’re a quick, affordable DIY fix.
Conclusion
Your closet can become a surprisingly effective studio — if you focus on placement, absorption, and airflow. Moving your rig out of your immediate space often beats adding more foam or soundproofing. Think of your closet as a flexible, low-cost solution that, with a few smart tweaks, sounds professional and keeps noise where it belongs: in the room, not in your ears.
Remember, the best fix is often the simplest: move it, treat the reflection points, and ventilate properly. Your quiet, focused space is just a few strategic steps away. So go ahead, turn that cluttered closet into your new creative HQ.